Slate Roof Inspection & Repair Cost Guide | Historic Care
Natural slate is widely regarded as one of the most durable and architecturally distinguished roofing materials available. Sourced from metamorphic rock quarries, slate tiles possess exceptional density, low water absorption rates, and natural resistance to fire and chemical degradation. When installed correctly over a robust structural framework, a high-quality slate roof can achieve an operational lifespan exceeding a century. However, despite their geological permanence, slate roofs are complex mechanical assemblies subject to structural weathering, flashing deterioration, mechanical impact damage, and substrate movement.
Because slate tiles are rigid and brittle, managing their maintenance requires specialized skills that differ significantly from standard asphalt shingle or metal roofing practices. Neglecting minor tile fractures or failing to address failing perimeter flashings can quickly compromise the building’s interior envelope, leading to rotting wood decking and expensive structural damage. This educational guide breaks down the physical evaluation criteria, material classifications, repair methods, and cost considerations involved in maintaining a slate roof. Property owners, facility managers, and historic preservationists will establish a clear framework to accurately identify damage, plan maintenance budgets, and ensure structural safety over the multi-decade lifespan of the roof.
Overview of Slate Architectural Lifespans and Structural Diagnostics
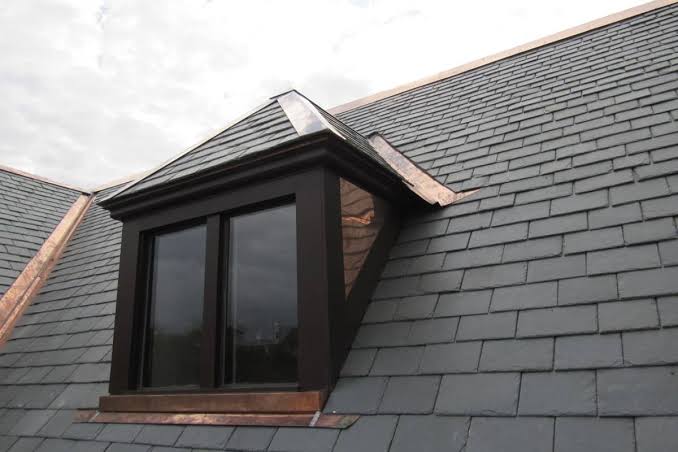
When property owners evaluate the upkeep of historic or premium properties, understanding the slate tile roof inspection and repair cost requires looking past the surface of the stone. A slate roof is not a single layer; it is an integrated water-shedding system consisting of structural timber sheathing, heavy-duty underlayments, overlapping slate tiles fastened with specialized copper or slate nails, and custom metal flashings along valleys, chimneys, and dormers. The physical inspection phase focuses heavily on checking both the condition of the stone tiles and the integrity of the underlying utility components.
The core objective of a formal inspection framework is to separate localized mechanical issues from widespread geological failure. Natural slate undergoes a slow, multi-decade weathering process where mineral impurities expand, causing the stone to soften, delaminate, or absorb moisture over time. A professional inspection determines whether a leak is caused by simple individual slate breakages (often caused by falling tree limbs or foot traffic) or by systemic degradation of the structural copper flashings and underlying fasteners. By establishing a clear baseline of the roof’s true physical condition, owners can avoid unnecessary full-roof replacement quotes and instead target specific structural fixes that preserve the asset elegantly.
Material Classifications and Maintenance Approaches
Slate maintenance systems are grouped by the chemical or structural composition of the tiles and the mechanical methods used to attach or support them.
Slate Material and Repair Methodologies
| Category / Type | Description | Common Use Case | Time / Cost / Effort Level |
| Traditional Copper-Nail Repair | Replacing broken tiles by pulling the old nail using a slate ripper, sliding in a new matching tile, and nailing it via the exposed shadow line, topped with a copper bib flashing. | Standard individual tile replacements on sloped roofs where surrounding slates remain stable. | Low execution time; Low material cost; Moderate physical effort. |
| Slate Hook Mechanical Fixing | Securing replacement tiles using a specialized stainless steel or copper hook driven into the underlying wood battens, holding the bottom edge of the slate. | Rapid maintenance over aged timber framing or high-wind zones where nailing would disturb fragile surrounding stones. | Low execution time; Low cost; Minimal physical effort. |
| Synthetic/Composite Slate Repair | Utilizing molded polymer or rubber-blend replicas to patch sections of modern composite slate roofs. | Contemporary properties built with engineered alternative materials rather than natural quarried stone. | Medium installation time; Moderate cost; Low physical effort. |
| Full Valley and Flashing Reconstruction | Stripping away border slate courses to remove and replace degraded copper or lead-coated valley liners and step flashings. | Roof systems where the slate stone remains durable but the underlying metal flashings have rusted through. | High time investment; High material cost; Maximum precision effort. |
Choosing the proper maintenance path requires identifying the origin of the slate and checking the condition of the existing fasteners. For instance, hard slates from specialized quarries (such as Vermont unfading greens or blacks) retain their physical density for over a century, meaning maintenance is usually limited to replacing copper flashings or fixing minor mechanical breaks. On the other hand, soft slates (such as certain historical imports) are more porous and prone to flaking and delamination after 60 to 80 years, meaning they require comprehensive tactile evaluations to ensure the stone core remains strong enough to hold replacement fasteners safely.
Practical Inspection and Repair Field Scenarios
To clarify how these engineering and diagnostic principles work in practice, consider three distinct physical field applications.
Scenario 1: The Post-Storm Ice Dam Puncture
An installation on a two-story historic residence in a northern climate, where severe winter ice dams and falling tree branches have fractured several lower eave tiles and bent the copper gutter flashings.
-
Key Inspection Protocols: 1. Set up a secure perimeter ladder loop and inspect the lower eave courses using a tactile probe.
2. Use a specialized slate ripper tool to hook and pull out the broken pieces and rusted fasteners of damaged tiles.
3. Slide in a fresh, color-matched natural slate tile cut to identical dimensions.
4. Secure the new slate by driving a copper nail through the vertical joint line, and slide a bent copper bib flashing underneath the course above to seal the nail hole.
-
Relevance: This baseline scenario represents a standard local maintenance task, focusing on fixing physical impacts and seasonal ice expansion without disturbing the surrounding roof plane.
Scenario 2: The Systemic Valley Fastener Failure
A large-scale institutional or church roof where the natural slate tiles are structurally sound, but the underlying century-old iron or low-gauge fasteners have rusted through, causing slates to slide out of alignment along the main roof valleys.
-
Key Inspection Protocols:
-
Set up structural roof scaffolding to safely inspect the main drainage valleys.
-
Systematically remove the border slates along both sides of the valley to expose the original metal liner.
-
Extract all deteriorated iron nails and clean out organic debris from the wood sheathing substrate.
-
Install a fresh 16-ounce cold-rolled copper valley flashing membrane, and re-hang the slate tiles using high-tensile copper nails.
-
-
Relevance: This application addresses the challenge of sub-surface utility failures, showing that a slate roof can require extensive structural renovation even when the stone itself remains perfectly intact.
Scenario 3: The Historic Soft-Slate Delamination Audit
An inspection executed on an aging municipal building featuring a soft-slate roof system showing signs of surface powdering, mineral efflorescence, and widespread tile thinning.
-
Key Inspection Protocols:
-
Perform an individual sound check on suspicious tiles by tapping them lightly with a small metal tool (a dull thud indicates a soft, failing slate; a clear ring indicates stone integrity).
-
Map out zones of severe mineral decay and delamination using high-resolution imagery.
-
Swap out structurally soft tiles using stainless steel slate hooks to avoid shattering fragile surrounding slates.
-
Package a comprehensive lifecycle report outlining the remaining functional operational lifespan of the entire roof.
-
-
Relevance: This scenario highlights forensic material analysis, demonstrating how to identify advanced mineral decay and select gentle repair methods to extend the roof’s lifespan before a full replacement becomes mandatory.
Comparative Evaluation
Scenario 1 leverages simple hand tools and standard copper bib techniques to quickly fix localized mechanical damage. Scenario 2 scales engineering complexity significantly, requiring structural scaffolding and heavy metal fabrication to rebuild critical water channels. Scenario 3 focuses on material health audits, using acoustic testing and low-impact mechanical hooks to safely maintain a fragile, aging stone system.
Financial Budgeting and Resource Frameworks
Developing an accurate budget framework for a slate project requires separating basic diagnostic evaluation fees from structural material procurement and specialized master-artisan labor. When calculating the overall slate tile roof inspection and repair cost, property owners must factor in the structural pitch of the roof, building heights, tile sourcing difficulties, and specialized safety gear setup.
Sample Project Maintenance Budget Framework
| Category | Estimated Amount / Effort | Explanation | Optimization Tips |
| Comprehensive Diagnostic Inspection | $250 – $750 | Visual and tactile inspection of tiles, attic leak checks, flashing audits, and detailed condition reporting. | Hiring an independent slate consultant instead of a general contractor ensures an objective report focused on repairs rather than full replacement sales. |
| Individual Slate Tile Replacement | $50 – $150 per slate | Sourcing matching salvaged or fresh quarried stone, extracting broken tiles, and mechanically fastening new slates. | Standardizing on common regional slate colors lowers custom quarry matching surcharges and lead times. |
| Flashing & Copper Valley Repair | $40 – $120 per linear foot | Stripping border tiles, installing fresh 16oz copper liners, soldering joints, and re-setting slates. | Never use cheap aluminum or plastic flashings on a slate roof; mixing short-lived metals with long-lasting stone guarantees premature leaks. |
| Sub-Surface Decking Remediation | $4.00 – $12.00 per sq. ft. | Replacing water-damaged or rotted wood sheathing or tongue-and-groove boards exposed by long-term leaks. | Catch leaks early through annual inspections to avoid expensive structural wood framing repairs. |
| Specialized Safety Setup & Scaffolding | $800 – $3,500 total | Erecting scaffolding towers, installing temporary roof hooks, and setting up OSHA safety lines on steep pitches. | Group all minor tile repairs into a single service visit to spread fixed scaffolding and setup fees across the entire project. |
Note: The cost framework metrics and resource allocations outlined above serve as illustrative examples based on historical material and labor indices. Final field quotes will vary according to localized labor structures, roof pitch complexity, structural deck remediation demands, and current copper market index adjustments.
Methodological Repair Strategies and Hardware Tools
Maintaining a slate roof requires a unique set of traditional hand tools specifically engineered to manipulate stone tiles without exerting destructive pressure on surrounding components.
1. The Slate Ripper Tool Technique
The slate ripper is an elongated, flat steel tool featuring hook notches along its blade tip.
-
Mechanism: The technician slides the flat blade upward beneath a broken slate, hooks the hidden nails, and strikes the handle base with a hammer to snap or pull the old fasteners out clean.
-
Advantages: Allows for the clean extraction of broken tiles and old nails without having to remove or disturb the overlapping layers of stone above.
-
Disadvantages: Requires precise physical control; reckless pulling can scratch or crack adjacent underlying slates.
-
The Slate Hammer and Punch: A specialized multi-functional tool featuring a heavy claw face for pulling nails, a pointed pick tip for punching precise nail holes through raw stone slabs, and a hardened steel edge for minor trim work.
-
The Slate Cutter: A mechanical drop-lever blade or handheld plier tool used to cut clean straight lines or custom angles on new slate tiles on-site without fracturing the internal stone matrix.
-
Copper Bib Flashings: Small, rectangular sheets of flexible copper bent slightly and slid over new repair nails, acting as a small roof canopy that diverts rainwater away from the newly driven fastener hole.
Safety Protocols, Height Risks, and Preservation Pitfalls
Working on a slate roof involves considerable physical and structural risks. Failing to follow strict material handling rules can result in structural damage or dangerous falls.
-
Walking Directly on Slate Surfaces (The Puncture Failure): The most common mistake made by general painters, chimney sweeps, or standard roofing crews is walking directly across slate tiles like they are asphalt shingles. The concentrated weight of a person will immediately shatter the rigid stone tiles, creating dozens of new fracture points and hidden leak zones across the roof. Prevention: Never step directly on slate; always utilize specialized hook ladders hooked securely over the roof ridge, or deploy padded roof cushions to distribute weight evenly across multiple tiles.
-
Utilizing Incompatible Roofing Mastics and Tar Patches: When a general handyman finds a leak on a slate roof, they often cover the damaged zone in thick, black asphalt roofing tar or plastic mastic. This creates a critical preservation error. The tar traps moisture underneath, ruins the look of the natural stone, and dries out and cracks within a few seasons. Furthermore, the sticky residue ruins the surrounding slates, turning a simple single-tile repair into an expensive multi-tile replacement project. Prevention: Insist on a strict zero-mastic rule; all slate leaks must be resolved through mechanical stone replacement and proper metal flashing installation.
-
Using Rigid Iron or Electro-Galvanized Fasteners: Nailing replacement slates with standard steel or cheap galvanized nails is a serious engineering mistake. While these fasteners work fine for short-lived asphalt roofs, they will rust out within 10 to 20 years when exposed to moisture beneath porous stone, causing the slates to come loose and slide off the roof long before the stone itself degrades. Prevention: Specify only high-tensile copper, solid brass, or marine-grade stainless steel nails to ensure the fasteners match the 100-year lifespan of the slate.
Long-Term Asset Management and Preventative Care
While a properly engineered slate exterior avoids the rapid granule loss and organic rot common to traditional asphalt shingles, maximizing its multi-decade operational lifespan requires a consistent preventative care routine.
-
Bi-Annual Roof System Maintenance Checklist:
-
Clean leaves, twigs, and pine needles out of the roof valleys and perimeter gutters to prevent water from backing up under the flashing trim.
-
Inspect the rubber pipe boots around plumbing stacks and metal counter-flashings around chimneys for signs of UV cracking or caulking failures.
-
Check the attic space interior roof boards after major storm cells to catch any micro-leaks or water staining before they rot the ceiling drywall.
-
-
Environmental Preservation Guidelines:
-
Trim back overhanging tree branches a minimum of 6 to 10 feet away from the roof line. This prevents branches from scraping away the protective ceramic granules during high winds and stops tree debris from trapping moisture on the shingle face.
-
Performance Verification and Engineering Project Documentation
Maintaining an organized archive of your installation documents ensures subsequent home property appraisals, local zoning audits, or insurance adjustments proceed smoothly without logistical delays.
Systematizing Construction Records
Property owners should compile an organized physical or digital file ledger containing signed municipal permits, official manufacturer system warranty registration certificates, aggregate material delivery tickets, and clear photographs of the sub-surface deck preparation.
Illustrative Structural Documentation Profiles
-
Example A: A homeowner files a photograph of the open foundation trench showing that the perforated drain tile was laid with the holes facing downward in a clean bed of gravel. This provides clear proof to a home inspector that the drainage system was built fully to code.
-
Example B: During a real estate transaction, the seller presents a copy of an official structural engineer’s wet-stamp certification for a 5-foot hillside wall, verifying to the buyer’s mortgage company that the structure is completely sound.
-
Example C: An owner stores the original invoice from a regional quarry detailing the exact tonnage and name of the natural slate used. This makes it simple to order a perfect color-match batch if they choose to expand the terraced garden years later.
Closing Summary
Successfully planning and executing a structural transformation using a slate tile roof inspection and repair cost framework depends on balancing proper subsurface preparation with quality material selection. While natural stone demands a higher initial investment of labor and capital than basic concrete blocks or timber ties, it delivers unmatched durability, exceptional resistance to the elements, and an authentic aesthetic that enhances a property’s long-term asset value. By focusing on deep base compaction, maintaining a proper backward wall batter, and ensuring an open gravel drainage channel, homeowners can secure a permanent structural asset that functions flawlessly for decades.
Frequently Asked Questions (FAQ)
How can you tell if a slate tile roof is approaching the end of its useful geological lifespan?
A slate roof nearing the end of its functional life will show widespread signs of deep mineral decay. The tiles will change color uniformly, develop white efflorescence powder lines across their faces, flake apart in large layers, and become soft enough to crumble under simple finger pressure. If a light tap with a metal tool produces a dull thud instead of a clear ringing sound across large sections of the roof, the stone has lost its integrity and the roof must be slated for full replacement.
Can you use standard asphalt roofing shingles to patch a small hole on a slate roof?
No, using asphalt shingles to patch a natural slate roof is an improper technique that will fail quickly and lower property values. Asphalt shingles lack the thickness, rigidity, and weight needed to interlock correctly with surrounding stone courses, creating a weak spot that wind will easily rip open. All slate repairs must be executed using matching natural stone or approved high-density composite slate tiles to preserve the roof’s waterproofing system and look.
Why are copper bibs used during individual slate tile repairs?
When a technician replaces a broken slate tile using traditional methods, they must drive a new copper nail through the narrow vertical space between the two tiles sitting directly above the repair slot. Because this leaves the new nail head exposed to the elements, sliding a flexible copper bib flashing up underneath the upper course covers the nail completely, acting as a small shield that keeps rainwater from seeping down the new fastener hole.